Scheam driven web service development is quite popular in Java world, JAXB and JAX-WS are both mature standard, and frameworks like CXF, Axis are famous amount many developers for fast service development. It’s common to do scheam driven developent on server side, can scheam driven client development be done on Android? Yes, it can. Today I will show you how do do scheam driven development on Android by leveraging following light-weight frameworks:
The serivce I choose for demo is eBay Finding service, here are why I choose this service:
- I have some direct experience with this service.
- eBay Finding serivce supports schema driven development since it provides a wsdl, at the same time, it also supports RESTful style service call.
If you are not familar with this serivce, please visit its official site.
The Big Picture
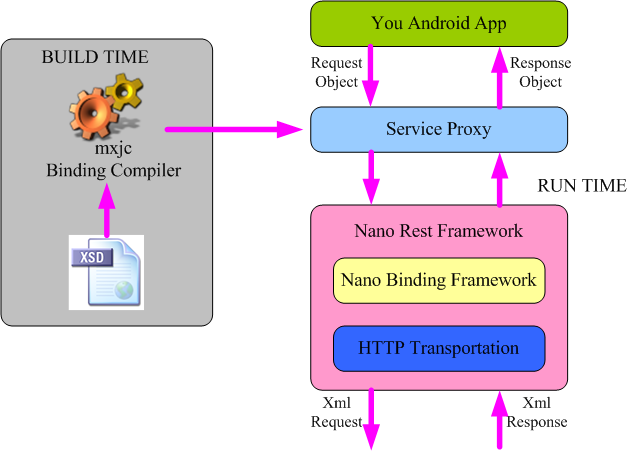
The picture above is the blueprint of scheam driven development on Android. The left part of the blueprint is a build time view, here we leverage mxjc binding compiler to automatically generate service or domain classes from scheam or wsdl; The right part of the blueprint is a runtime view, a typical flow starts from your Android app, it issues request object on proxy component, the proxy passes the request to the Nano restful framework which will delegate the object to xml marshalling work to Nano binding framework and send the xml request to external service through HTTP transportation component, when an xml resposne is received by the HTTP transportation component, the Nano restful framework will also delegate the xml to object unmarshalling work to Nano binding framework and passes the response object to the proxy which will return the response object back to the calling app.
Let’s follow the blueprint and build a simple Android app step by step:
Step 1 : Generate service classes from schema
The first step of scheam driven development is to generate service classes from schema or wsdl, let’s download eBay Finding serivce wsdl here, also, let’s download mxjc binding compiler zip package by following links on the github site, extract the zip package, suppose we put the wsdl in the same folder as the extracted zip package, then we execute command(suppose we are in Windows environment, Unix environment will be similar).
1
| |
When we execute this command, the schema inside the wsdl will be parsed by the binding compiler and Nano bindable classes will be generated, by default, the binding compiler will derive package name from wsdl, but you can override this by providing custom package name directly as command line options.
‘-wsdl’ option is needed since we are generating from wsdl, not default xsd.
By default, the service classes will be generated in the current directory.
Step 2: Create a New Android Project
Now let’s create a new Android project in IDE like Eclipse with ADT installed, to use Nano-rest client framework, the Android API version must be equal to or newer than 7(Androdi 2.1 or above), this is required since Nano-rest leverages Android Service mechanism for asynchronous service invocation.
With new Android project created, let’s add Nano-rest jar in the libs folder of the project, the Nano-rest jar can be downloaded by following link on the Nano-rest github site, the shaded jar is preferred since it already includes Nano xml binding framework dependency, otherwise, you have to add Nano xml binding framework jar separately. Now, let’s copy the above generated service classes into the src folder the project, if we refresh the project, there should be no compiling error since all imports in the generated classes can be resolved by the Nano-rest shaded jar reference.
To let Nano-rest framework work correctly at runtime, we must added following declarations in the manifest file of the project:
1 2 3 4 5 6 7 8 | |
The uses-permission declaration is needed for internet access, the minSdkVersion declaration has be explained above, and the HTTPRequestExecutorService class is required for asynchronous service invocation, synchronous service invocation may block Android main UI, leading to process crash, this is not expected, so as a best practice, we should always invoke service asynchronously on Android.
Step 3 : Create eBay Finding API Proxy
Web service client proxy can simplify service invocation code, usually, web serivce framework like CXF or JAX-WS has tool to auto-generate service proxy from wsdl, however, current mxjc binding compiler does not support proxy generation yet(it can only generate service classes from schema), but it’s not hard for us to write proxy class manually since Nano-rest has already encapsulated generic service invocation logic for us, we only need to extend it and add a few service specific logic, let’s just do it:
First, let’s definite some constants which will be used later:
1 2 3 4 5 6 7 8 9 10 11 12 13 | |
These constants are quite self explanatory, so I won’t give more comments.
Then we build a simple authentication class, eBay Finding serivce need a APP NAME as one of http request headers, so we just add it,
1 2 3 4 5 6 7 8 9 10 11 12 13 14 | |
Note, before you can run the final finished application, you mush replace the APP NAME placeholder with your own eBay developer APP NAME which can be applied on eBay developer site.
Next, let’s build a generic request processor for eBay Finding serivce, with this base request processor, all specific request processors(supported by eBay Finding service) can be easily built later, let’s see the full definition of this base request processor:
1 2 3 4 5 6 7 8 9 10 11 12 13 14 15 16 17 18 19 20 21 22 23 24 25 26 27 28 29 30 31 32 33 34 35 36 37 38 39 40 41 42 43 44 45 46 47 48 49 50 51 52 53 54 55 56 57 58 59 60 61 62 63 64 65 66 67 68 69 70 71 72 73 74 75 76 77 78 79 | |
Base request processor is the core of the proxy, let me give more comments about the base processor:
1. we extend NanoXmlRequestProcessor class, since we want to leverage Nano xml framework for request marshalling and response unmarshalling.
2. In the constuctor, we provides request object, operaion name and
a HttpCallback instance as parameters and delegate these parameters to the super class, the requst object is an eBay Finding request object like FindItemsByKeywordsRequest object, the operation name is required by eBay Finding service as request header, and I will give more explanation about the HttpCallback instance later.
3. Also in the constructor, we set eBay Finding service production endpoint url on the rest client(replace here if you need to access sandbox instead), plug in authentication provider defined above, and add operation name as request header. Note, authentication provider plugin is not necessary, you can always add APP NAME directly on the rest client as a request header, I use authentication provider here just to show the formal way to do authentication when Nano-rest framework is used.
4. The response handling logic of the eBay Finding serivce needs a special fix, usually, eBay service supports RRE(resposne resident error), means error message are wrapped in a normal response message, but in some cases, eBay Finding service may return a single error xml message without a wrapping response. In order to fix this, I overrided the Nano-rest response handling logic, please see handleResponse and
parseErrorMessage methods for details.
The responseHandler(defined in super class and returned by getResponseHandler method) is assocated with the HttpCallback instance passed in the constructor, it only has two methods: handleSuccess and handleError, usually, if the service invocation is successful, then handleSuccess method should be called, otherwise, handleError method should be called, responseHandler is only responsilbe for the callback, concrete success or error handling logic is defined by application logic.
With base processor defined, it’s quite easy to define a specific request processor, let’s define a FindItemsByKeywordsReqeustProcessor since I will use this function of eBay Finding service as demo:
1 2 3 4 5 6 7 8 9 10 11 12 13 14 15 16 17 18 19 | |
Not much code, and no magic here if you are familar with Java generic. We just define a factory method, provide specific parameters requried by FindItemsByKeywords API call. Use this method as template, it’s not hard for you to create other request processors, like
getFindItemsAdvandedRequestProcessor, getFindItemsByCategoryRequestProcessor, etc, all functions of eBay Finding service can be defined in this way, actually, you can even build a complete eBay Finding SDK in this way for later reuse.
Step 4: Write real application logic and UI
Now it’s time for us to write real application logic and UI, in this demo, I just want to show minimum application logic and UI, the UI part only has an EditText as keywords input and a Button to trigger search by calling FindingItemsByKeywords API, and a Toast for response display. The application logic is even simpler, let’s see the whole definition of the Main Activity:
1 2 3 4 5 6 7 8 9 10 11 12 13 14 15 16 17 18 19 20 21 22 23 24 25 26 27 28 29 30 31 32 33 34 35 36 37 38 39 40 41 42 43 44 45 46 47 48 49 50 51 52 53 54 55 56 57 58 59 60 61 62 63 64 65 66 67 68 69 70 71 72 73 74 75 76 77 78 79 | |
The code is easy to understand if you know Java and Android, let me give a few comments:
1. We register a click listener to the button, inside the listener is the main application logic:
get keywords input and build a FindItemByKeywordsRequest object, get a FindItemByKeywordsRequestProcessor from the factory we defined above, and invoke the request processor asynchronously at last.
2. When we build the FindItemByKeywordsRequestProcessor instance, we passed in a FindItemsByKeywordsCallback instance as parameter, FindItemsByKeywordsCallback implements HttpCallback interface, it contains the main response logic, this is the place when final asynchronous response handling happen. Usually, inside a HttpCallback, we update UI according to the success or failure of the response, in this case, if the response is successful, we show the title of the result item, if there is http error, we show the status code and message. Since eBay Finding service support Response Resident Error(RRE), even in the onSuccess callback, we still need to check the Ack value to find out if there is application error and handle accordingly.
Here I just show a typical asynchronous service invocation paradigm using Nano-rest framework, you can follow this paradigm for other service invocations according to your real needs.
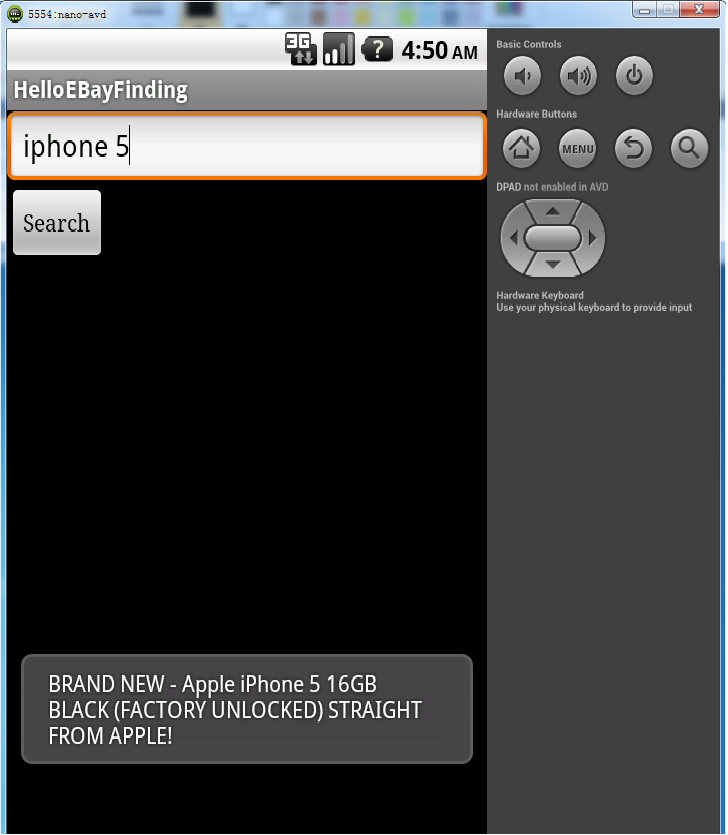
Step 5 : Run the application
Now lets run the application, note again, please fill in your APP NAME before you run the application, below is the UI of a success case:
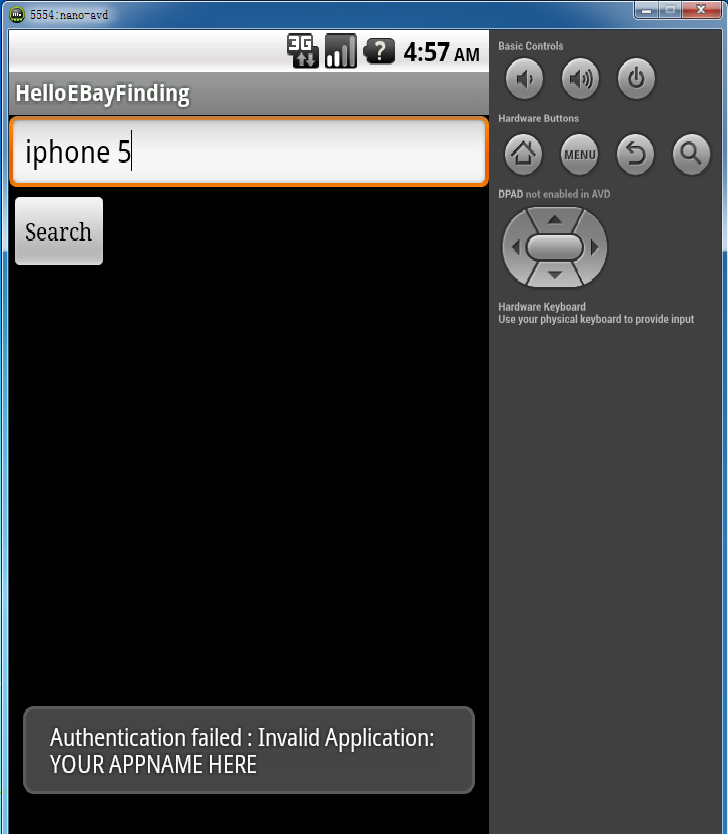
Let’s provide an invalid APP NAME and try again, below is the UI of the failed case since the APP NAME is invalid:
To facilitate debug and trouble shooting, you can always check the request or response xml by looking at the log in the LogCat provided by ADT.
Conclusion:
The demo shown in this tutorial is just a bare minimum or starter kit, there is still much work to do before you can release a fully functional service backed Android application, but anyway, with a reuseable service proxy, you are free from low level and error-prone serivce message parsing and http handling anymore, instead, you can put your effor on main application logic and UI, this can definitly accelerate the development of the application.
Scheam driven development is a popular and mature development methodology, when used appropriately, it can improve development efficiency and enhance the reliability and maintainability of the application. Now with the support of Nano-rest framework and the mxjc binding compiler, we can also do schema driven client development on Android.
You can find the whole source of the sample application and all the generated eBay Finding service classes here.
Update 1 (2.20.2013)
A similar proxy and a demo for eBay Shopping API have been created, get the whole source here. With the Shopping API proxy as SDK and the demo as template, you may create a functional eBay Shopping API based appliction for Android, you may even mix both eBay Finding and Shopping APIs in your application, cool.
Update 2 (2.21.2013)
A similar proxy and a demo for eBay Trading API have been created, get the whole source here. Now you can build more cool eBay Apps on Android, like buying and selling Apps, enjoy!
Note eBay Trading wsdl has some issue to work with mxjc directly, if you want to generate eBay Trading proxy from eBay Trading wsdl using mxjc, you need to do following fix:
- Remove an any element declaration in ReviseInventoryStatusRequestType, since any has already been declarated in the AbstractRequestType(from which ReviseInventoryStatusRequestType extends).
- Add a RequesterCredentials(of type CustomSecurityHeaderType) element in AbstractRequestType, such that eBay token authentication can work with XML call.
- Add following annotation in the schema definition(at the beginning):
1 2 3 4 5 | |
since the numbe of members in some enum types in wsdl exceeds the maximum allowed by defult xjc/jaxb processor. Of couse, you also need to declare jaxb namespace and version in wsdl definition. Here is a fixed eBay Trading wsdl(version 809), you can search ‘mxjc’ to find out what I have fixed.
Also, eBay Trading wsdl is very big(> 5M), leading to big jar after code generation and compilation, however, eBay provides a wsdl pruner tool, to minimize jar of your application on Android, you can use this tool to prune the wsdl according to the operations you need, for example, if you only need AddItem operation, just choose this operation, the pruner will ensure only AddItem call related types are left in wsdl after pruning.