This is the first post of Pico Tutorial Series, in this post, I will show you how easy to use Pico framework to put WSDL driven application development on iOS platform into practice. If this is the first time you get to know Pico, then after this tutorial, you will bascially understand what Pico can do for you, and the basic development process when using Pico to run WSDL driven development on iOS. If you want to see the big picture, plese read this post first.
The whole source of this demo is here.
WSDL driven development using Pico framework has following steps:
- Generate Objective-C proxy from WSDL
- Create new iOS project, add Pico runtime and generated proxy into your project
- Implement appliction logic and UI, call proxy to invoke web service as needed.
Let me cut to the point and show you each step using a simple while popular StockQueue web serivce from WebserviceX.NET.
Step 1 - Generate Objective-C Proxy from WSDL
Pico has an accompanying code generator which can generate Objective-C proxy from wsdl, the tool is called mwsc, please download the latest zip package here then extract it into your local folder. Note : mwsc code generator needs Java 1.6 or above to run, so please ensure Java is installed on your MacOS, if not, please install it first.
The command line script mwsc is in the bin folder, please add executable right to it before you run it, you may optionally create a folder as your code generation target(for example, generated), otherwise, mwsc will generate code in current folder, now let’s generate code from wsdl by running flowing command in the terminal:
1
| |
If everything works fine, you will see the code generator output generating code… and done at the end, the target proxy will be generated in the generated folder, the code generator may throw a few warnings, asking us to add extension options for some ports, since we won’t use those ports, just ignore them right now, it’s all right as long as the SOAP port is generated correctly.
Step 2 - Create New iOS Project, Add Pico Library and Generated Proxy into Your Project
For this demo, we just create a simple iOS single view application, please don’t choose ARC when you create the project, since Pico does not support ARC yet.
Now we need to import Pico library into the project first, there are two options, you can either include all Pico source into your project, or add Pico as a static library into your project, in this tutorial, I just show you the second option, if you want to include the whole Pico source, please see Pico github site for instructions.
Suppose you have downloaded Pico source project from github site, then:
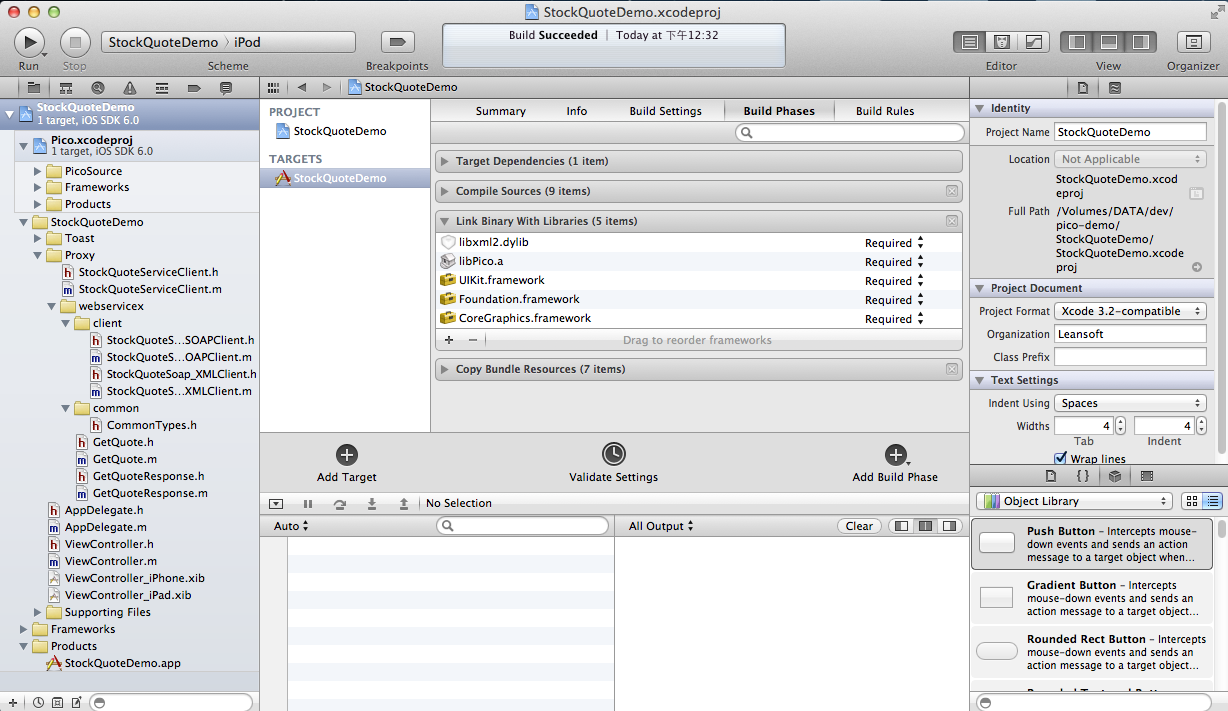
- Drag the Pico xcodeproj into your project,
- In the Build Phases of the target, add
libPico.aandlibxml2.dylibto “Link Binary With Libraries” section.- In the Build Setting of the target, add [your path to Pico source] to “User Header Search Paths” setting, choose “recursive” seach path.
Now create a group in your project called Proxy(or other meaningful name you choose), then drag the proxy generated in step 1 into this group, choose “Copy items to destination group’s folder” and “add to targets” when prompted.
Now since both Pico library and the StockQuote web service proxy have been added in the project, you can try to build the project, if no build error, job well done, you can continue to the next step, otherwise, please do some toubleshooting, or check the source of this tutourial(in the Examples folder of Pico).
Below is an Xcode screenshot after finishing this step(please save the screenshot to local to view if the web version is not large enough to view clearly):

Note, in the demo project, I also added a third party library called Toast which can produce toast style message, this is just for the convenience of demo, it is not necessary for you to do so in your real project.
Step 3 - Implement Appliction Logic and UI, Call Proxy to Invoke Web Service as Needed.
Pico use AFNetworking Http client for low level communication, as an AFNetworking best practice, it’s not necessary for you to initiate a new client everytime you call service, a singleton client instance is enough for the whole application, so before writing any applicaiton logic, let’s create a shared StockQuote service client for later use, see code below:
1 2 3 4 5 6 7 | |
1 2 3 4 5 6 7 8 9 10 11 12 13 14 15 16 17 | |
The code is quite self-explanatory, the shareClient static factory method just returns a StockQuoteServiceClient(which extends StockQuoteSoap_SOAPClient generated from wsdl, you can find StockQuoteSoap_SOAPClient in the Proxy group) instance with specified target service endpoint address, and there will be only one such client instance within the application.
Now time to the UI part, for this simple Demo, we only need an UITextField for company symbol input, an UIButton to triget getQuote service call and an UITextView for result dislay, quite simple, see definition in header file ViewController.h and instantiation in implementation file ViewController.m, in method viewDidLoad.
Now let’s implement application logic by calling the getQuote service, with the help of the StockQuote service proxy generated from WSDL, web service call through Pico is extremely simple, let’s review and understand the generated getQuote proxy interface first before writing calling logic:
1 2 3 4 5 6 7 8 9 10 11 12 13 14 15 16 17 18 19 20 21 22 23 24 25 | |
This is just a plain old interface generated from wsdl, unlike normal interface, this interface is asynchronous, when you call getQuote service, you need to provide a request of type GetQuote as first parameter, also you need to provide(or register) one success and one failure callbacks using Objective-C block, success callback will be called if the service invocation succeed, and you will get a response object of type GetQuoteResponse, usually, in success callback, you implement response handling logic and update UI according to the response; failure callback will be called if the service invocation fail, or there is any HTTP or Pico parsing error, you may either get a NSError(indicationg HTTP or Pico parsing error), or get a SOAPFault(indicating service call fail), usually, you implement error handling logic in failure callback and update UI accordingly.
By the way, although not necessary, I suggest you to review the proxy code generated by mwsc, this will help you better understand the inner working of Pico.
Let’s see the service call implementation of the demo, it’s in the getQuotePressed method in the ViewController implementation, getQuotePressed will be triggered when you click the GetQuote button on the UI:
1 2 3 4 5 6 7 8 9 10 11 12 13 14 15 16 17 18 19 20 21 22 23 24 25 26 27 28 29 30 31 32 33 34 35 36 37 38 39 40 41 42 | |
The call logic can’t simpler, I’ve added comments in the service call code for you to better understand the call flow. Also, I’ve enabled the debug mode of the proxy, so you can see the detailed request/response messages when you run the demo, this feature is extremely useful for troubleshooting.
Final Step - Run the Demo
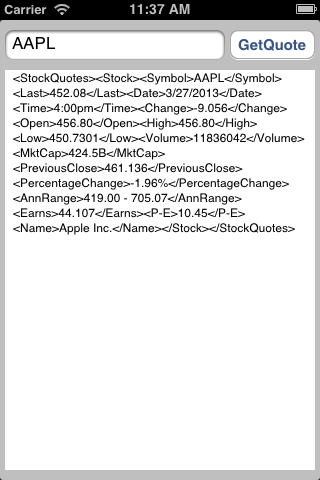
Now it’s time to run the demo, let’s try it in the simulator(you may use a real device of course ), I just want to see the stock quote of Apple(company symbol AAPL), below is a screenshot of the simulator.

The StockQuote web service just return stock quote information in XML format, so you see the result in xml.
You can also find the debug output in the XCode, like below:
1 2 3 4 5 6 7 8 9 10 11 12 13 14 15 16 17 18 19 20 21 22 23 24 25 26 27 28 29 30 31 32 33 34 | |
If you have any problem to run the demo, please check the debug output first.
Now you see the Power of pico framework, you don’t get troubled with error prone and tedious SOAP/XML parsing or http handling, the generic Pico framework will do these stuff for you, you only need to use a plain old asynchronous interface for service invocation, this can not only accelerate application development, but reduce the long term maintenance cost.
StockQuote is just a bare minimum demo, there are other more featured demos(like Amazon, eBay search demo) in the Examples folder of Pico source project, please try them to better understand how Pico works, then you can begin to develop your own service based applications, using wsdl driven methodology supported by Pico.
See your next great application!